|
The International Camellia Society [ TOPICS  ] [ Cultivation Page ] [ Cultivation Page ] [ Seedling Grafts ] ] [ Seedling Grafts ]
|
The Introduction
This experimental work was induced by Dr Jean Creze in France. He has developed a method to micrograft buds into seedlings, in order to get rid of virus which has indeed infected most Camellia plants. I visited him some time ago and he was so generous to demonstrate his procedure. He gave me all his material and I will certainly post this and his results here at the internet. Most his material is in French, with wich language I have difficulties. But be patient, it is on its way. To my knowledge his approach is the first successful attempt to get rid of Camellia virus. As I understand, one can now buy a virus free 'Ville de Nantes' (which is often variegated in the leaves) at Mr. Thoby's place in Carquefou.
The graft into a developing seedling seems to be a quick method in order to establish a new plant of a given cultivar. With grafting, you need a scion or shoot of the wanted cultivar, and an understock, normally a robust and vital C. japonica or C. sasanqua. The understock is cultivated for about two years. There are several methods of grafting, each requires skill and knowledge. Most grafts can only be done at certain development stages of the understock. Since germinating plants are available all the year, one is not bound to special seasons when the graft is done into the seedling as the understock. When the graft fails, both the scion and the seedling can be reused for a further attempt. The union between the two parts can occur within three weeks. The reasons are:
- The seedling tissue is very young and vigorous and calluses almost instantly when cut.
- The cut end of the scion calluses much faster compared to normal cutting medium.
My experience with this technique is only 4 weeks, and certainly the results described here are all preliminary. I will give more information as soon as I feel to have success with different appraoches. So far I will give the details of the presently most successful method, the graft of the scion into a cleft of the epicotyledon.
The Equipment
- A scalpel or a very sharp small knife
- A small gas burner
- Hard grafting wax as used for grafting grapes
- A small metal loop (inoculating loop, 3mm), nichrome wire
- Sterile water (best cooked in a pressure cooker)
- A germinated Camellia in the unfolded state
- A scion, not too soft
Seedling Graftsby Klaus PeperThis experimental work is devoted to Dr. Jean Creze, France. |
The Illustration

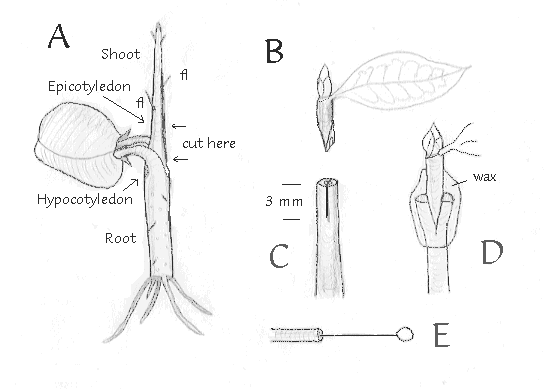
A. The germinated Camellia seed, or the understock. Note that the Epicotyledon ends with the first forerunner leave (fl). B. The cut scion. C. The cut portion of Epicotyledon. D. The united graft with indicated wax. E. Inoculating loop with handle.
The ProcedureA. Cleft graft into the ShootThe shoot is quite thin, and only thin scions can be applied. According to my experience, the epicotyledon is a safer place to graft. Even in nature, the seedling can reduce the fluid supply to the shoot (for several reasons), and instead the sleeping axillary eyes at the axil of the cotyledon stalks may become active. It appears that the most active and vigorous tissue is located in this region.
In this method the cut through the seedling is done just underneath the cotyledon stalks. It is tempting to try this since here the shoot is thickest, and would fit best thicker scions. However, the hypocotyledon seems to be very short in Camellias (2-3mm), and a cut just above the stalks gives equal thickness. According to my preliminary results, this method is only partly effective, since it seems that the root tissue builds up callus at a reduced rate in comparison with the shoot tissue. This is very much the technique of Dr. Jean Creze. He found out the right wax to use, and introduced the trick with the water 'glue'. Jean does all his work under sterile conditions, which demands equipment and skill which is not available to everybody. However, it appears that perfect sterility is not necessary, although clean handling is obligatory.
I have done this operation several times and hope that the buds will thrive after a while. The two cuts have to be done exactly perpendicular, otherwise the bud will fall down. Thank you Jean! The preliminary ResultsIt appears that at least the knife and the water must be sterile: I have detected fungus hyphens in the graft cleft. 2. 9. 1996. I found that the operated seedling is easily infected by fungus like Botrytis: The spliced part of the understock turns brown and becomes soft. The graft is a failure, but can be recut and regrafted. Now I have adopted the following procedure: DEC 96: I now have successful (i.e., growing) grafts with all procedures, including the flat graft. However, many grafts were successful in the unification, but failed to grow. In most cases this was due to infection of the seedling. In order to make seedling graft a successful procedure, we have to experiment more to make this method safer. As soon as I have more experience, I will post them here. Meantime start your own grafts and and report! |
| [ Home ] [ TOP ] |